Overview
This guide outlines the procedure for using the Microsoft Authenticator application on your mobile device for Multi-factor Authentication (MFA) on U of G organizational accounts that have multiple users. As part of this process, each person that requires access to the account will need to scan a QR code in the authenticator app on their device. Information Security strongly recommends that this QR code is not stored or shared beyond the required users. Instead, we suggest that you gather all those who require access to this org account together in person or on a Teams meeting to scan the QR code at the same time (Note: The host of the Teams meeting should perform all of the setup steps listed in the "Set up the Microsoft Authenticator application for verification codes" section, while the attendees should only perform steps #5, #6, and #8 on their phone in the Microsoft Authenticator app). If that is not possible, the owner of the org account can go through the steps below on their own and follow the "OTHERWISE" scenario listed in step #8 to allow other users access to MFA on the org account.
Set up the Microsoft Authenticator application for verification codes
- ON COMPUTER: Go to https://aka.ms/mysecurityinfo then enter your U of G organizational account login and password into Office 365.

Note: If the account already has MFA enabled, you will need to work with the person on your team who originally registered the account for MFA, so they can either share the QR code they previously generated or approve the MFA prompt. The U of G Information Security team strongly recommends that you do not save/store this QR code.
- ON COMPUTER: Once signed in, select Security info from the left menu. If the account is already registered for MFA, you will be prompted for multi-factor verification. Then, select Add method in the Security info pane.

- ON COMPUTER: On the Add a method page, select Authenticator app from the list, and then select Add.


On the Start by getting the app page, if you or other users don't already have Microsoft Authenticator, select Download now to download and install the Microsoft Authenticator app on your mobile device, and then select "I want to use a different authenticator app":
Note: If other users are on a shared Teams call with you, they should also download or open the Microsoft Authenticator app, and follow the steps from here on out that are involved with the app.

- ON COMPUTER: Remain on the Set up your account page while you set up the Microsoft Authenticator app on your mobile device.

- ON MOBILE PHONE: Open the Microsoft Authenticator app, select Allow Notifications (if prompted). Then, select Add account from the Customize and control icon on the upper right, and then select the Other account option.

- Note: The first time you set up the Microsoft Authenticator app, you might receive a prompt asking whether to allow the app to access your camera (iOS) or to allow the app to take pictures and record video (Android). You must select Allow so the authenticator app can access your camera to take a picture of the QR code in the next step. If you don't allow the camera, you can still set up the authenticator app, but you'll need to add the code information manually. For information about how to add the code manually, see below.
- ON COMPUTER: Return to the Set up your account page on your computer, and then select Next. You will see the Scan the QR code page appears:
Note: Before scanning the QR code and choosing "Next" as mentioned on the page below, please review the next step for further instructions.

- IF you are on a Teams call and all users that require access to the account are present, they may scan the QR code. If you expect to add more people to the org account later in the future, select the "Can't scan image?" button on the Scan the QR code page and proceed to Step 10.
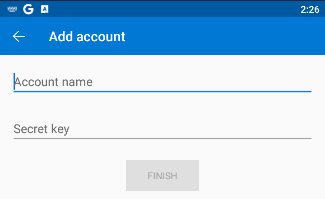
OTHERWISE, if you are setting up the MFA on your own, select the "Or Enter Code Manually" option at the bottom of your phone screen, and select the "Can't scan image?" button on the Scan the QR code page on your computer.

This will provide you with the Account name and Secret key, which you may enter into the corresponding text boxes in the Microsoft Authenticator app on your phone.
Note: The Account name does not need to be precise, but the Secret key must be entered exactly as shown, otherwise the code displayed in Microsoft Authenticator will not be correct, and you will not be able to login with MFA.

- ON MOBILE PHONE: Once the Account name and Secret key are entered into the text boxes, you can press the "Finish" button on your phone screen, and the account will be added to the Authenticator app.

- ON COMPUTER: IF you are the owner of the org account, you should record the Secret key shown on the "Scan the QR code" page for future use if the org account you are using will have new users added to it, so that you can provide them with the Secret key to enter into the MFA app directly (as you cannot retrieve this Secret key later).
Note: The Secret key should only be saved in a password manager (Bitwarden, Keeper, KeePass) accessible to the owner of the org account, and only distributed to users setting up MFA access via a OneTimeSecret link (https://onetimesecret.com/), by copying the Secret key into the text box on the OneTimeSecret page, selecting the "Create a secret link" button, and then sending the user the resulting link generated on the page.

- ON COMPUTER: Select "Next" on the Scan the QR code page on your computer. A box will appear to enter the 6 digits from your authenticator application. ON MOBILE PHONE: Open the newly added account in the authenticator app. You should see a six-digit code, displayed in the Microsoft Authenticator app under the newly added account. Enter the 6 code it displays into the "Enter code" page, then select "Next".

- ON COMPUTER: The newly added authentication method should be displayed on the Security Info page, and if you refresh the page, the Default sign-in method should show as "Authenticator app or hardware token -code". All users with the account now added in their Microsoft Authenticator app should be able to use the 6 digit code in the app as the means of MFA when logging into that org account (a good way to tell if everyone's account is setup properly, if you're setting up everyone in a Teams meeting, is to check that they all display the same 6 digit code, provided that they all have the time on their phone set correctly, as it is a time-based code).

IMPORTANT: IF the Default sign-in method is not listed as "Authenticator app or hardware token - code", you must do the steps below for the registration to prompt correctly.
To change your default security info method
- On the Security info page, select Change next to the Default sign-in method information.

- Choose Microsoft Authenticator - notification from the list of available methods. If you're not using the Microsoft Authenticator app, select the appropriate method.

- When logging in, you will be using the code in the format shown below.

NOTE: If someone on your team has an account setup with the authenticator application with the notification option as the default, whoever has the account added will get a notification. You will need to work with them to get access to the account.